What Is an Industrial Piercing Bump? Signs, Causes, Treatment, Cleaning, Aftercare
Piercings are a great way to alter your body’s appearance, and they are growing in popularity. The ears have always offered plenty of opportunities to express yourself with piercings.
One growing trend is the industrial piercing. Due to having two holes, there is a greater chance of things like infection. One of the most common occurrences is bumps on industrial piercings.
Let’s take a closer look at the piercing, bumps and other grows around them, and how to avoid issues when you get one.
What Is an Industrial Piercing Bump?
An industrial piercing bump is a bump that appears after a piercing due to inflammation. They will form around the hole after the piercing.
Piercing bumps are stable and do not grow after they form. They often leak fluid and have a pink color. That draining can help differentiate a bump on industrial piercings from keloids.
A bump on industrial piercings can take six months to a year to heal.
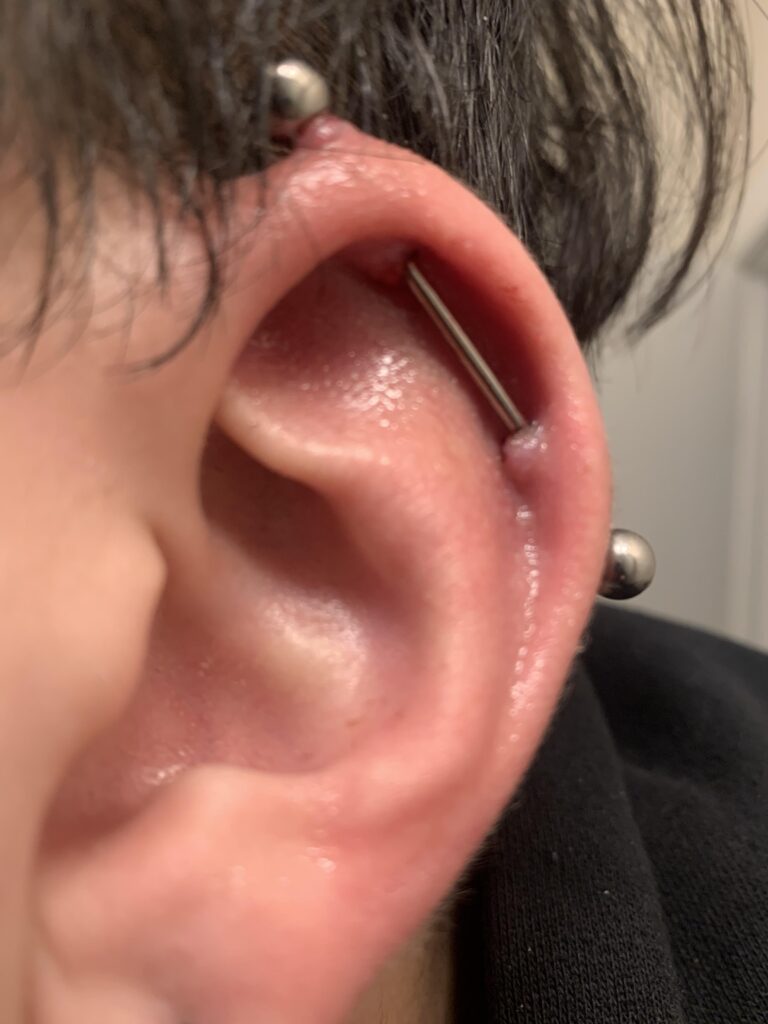
Image: Burning Inside.
Bumps Are Normal and Common on Industrial Piercing
Bumps are a natural response to the piercing damage and show that your body is responding and healing. The inflammation is what causes the bumps to begin with.
Bumps are common on industrial piercings. Industrial piercings are usually located in the helix and anti-helix of the ear. These upper locations are through cartilage and bumps are a common site in cartilage.
Industrial Piercing Bump With Pus Indicates Infection
Pus is an indicator that you have an infection in the area around your piercing hole. Bumps in upper-ear cartilage piercings can go away with time.
However, you need to treat the infection causing the pus to remove it. Infections will prevent your ear from healing if left untreated.
Industrial Piercing Bump vs Keloid
Bumps often leak fluid and have a pink color. That draining can help differentiate a bump on industrial piercings from keloids.
Keloids are scar tissue that rises above the skin around a piercing hole. The scar tissue develops 3 to 12 months after you get pierced, and a keloid can grow beyond the edge of the piercing hole.
It can grow for years after a piercing in some cases. Keloid tissue does not usually drain and can turn darker over the years.
Why Does My Industrial Piercing Have a Bump?
There are multiple causes of industrial piercing bumps.
- Inflammation during the healing process
- Infection in piercing
- Allergy to the metals used
Healing is the most experienced reason people get bumps near industrial piercings. The inflammation is a natural process that causes bumps to grow around the hole. Cartilage in the upper ear and nose often triggers this response.
The next type of bump that can appear after these piercings comes from infection. You often experience things like pain and redness with infections. Your safest bet is to see a doctor if you think you have an infection.
You might get a bump on your industrial piercing because of an allergic reaction. Some people have reactions to things like nickel. The location may also itch or turn red if you are allergic to the metals used.
You’ll need to choose high-quality jewelry that you aren’t allergic to like K gold and implant-grade titanium. They are hypoallergenic and less likely to be rejected.
Industrial Piercing Has a Little Bump After a Year?
Piercing bumps heal from the inside out, so it takes a while to completely return to normal. The length of time for healing increases thanks to the cartilage in the upper ear and can go beyond 1 year.
Industrial Piercing Bump Treatment
How to get rid of industrial piercing bumps? If you find a bump on your industrial piercing, don’t panic. There are steps you can take, including:
1. Clean Your Piercing Twice per Day
Use a homemade saline solution or an antibacterial cleanser approved by your piercer two to three times each day and always wash your hands before touching it.
Avoid harsh cleaners when possible. Using a warm Chamomile compress will also help with healing.
If your industrial piercing is already infected, you can also use antiseptic solutions, such as betadine, isopropyl alcohol, or diluted hydrogen peroxide.
2. Do Not Lance a Bump On Your Industrial Piercing
You should not pop the bump. All lancing will do is cause more damage at the piercing hole site. The piercing will become more painful and will start to bleed.
Accidents happen, so if you do pop the bump, drain it and clean it. Remember, popping the bump will open it and increase the chance of infections.
3. Do Not Touch Your Piercing
It can be easy to contaminate your industrial piercing, as hands are one of the dirtiest parts of the body. There is plenty of bacteria on your hands waiting to attack your piercing holes.
4. Over Cleaning Might Agitate Your Piercing
If you are always cleaning your piercing, you might agitate the skin around the piercing hole. That could cause more swelling as excessive cleaners may inflame the skin trying to heal.
How to Avoid Getting a Bump on Your Industrial Piercing?
There are several steps you can take to help your industrial piercing heal as fast as possible.
1. Use Safe Materials

Industrial bar piercing cute with CZ stones gold and silver titanium 14G $19.9, SHOP NOW.
You’ll need to choose high-quality jewelry that you aren’t allergic to like K gold and implant-grade titanium. They are hypoallergenic and less likely to be rejected.
You should also ensure you get pierced by someone experienced and reliable who utilizes the right cleaning and sterilization procedures.
2. Allow It to Fully Heal Before Changing the Jewelry
You must wait for an industrial piercing to heal completely before you try to change your jewelry. It commonly takes a minimum of 6 to 9 months.
A not-yet-healed piercing is prone to infection. Taking one piece of jewelry out and putting another in could introduce bacteria to the area. Plus, the trauma to the unhealed site may cause pain and bleeding.
3. Avoid Contact With Scented Soaps, Perfumes, Chemicals, and Other Chemicals
Protect it from cosmetics and hair products as they may cause an infection. If you plan to go to a hairstylist, tell them you have a fresh piercing so they can take precautions against touching it.
4. Avoid Using Headphones or Sleeping on the Ear You Had Pierced
Wear earphones instead of headphones to avoid applying unnecessary pressure on the piercings. Avoid sleeping on the recently pierced ear as this will also apply unnecessary pressure. It is recommended to not get both ears pierced at the same time.
Sleeping on your ear after a piercing can damage it, causing bumps to form. That is why piercing techs suggest ding one ear at a time. That allows you to rest on the side without the piercing, avoiding pressure.
While it can be challenging to sleep with a new industrial, place a clean t-shirt over your pillow so it does not get contaminated with bacteria while you sleep.
5. Watch for Signs of Infection
Finally, watch for signs of infection, such as swelling, tenderness, and pus drainage. If you notice any of these signs, contact your piercer immediately.
After you get your piercing, be sure to follow all instructions from your piercer.
How to Clean Industrial Piercing?
The best way to prevent complications is to perform the right aftercare. This involves cleaning your piercing at least twice a day.
Your piercer may give you a saline solution, or, you can make your own at home by dissolving ¼ teaspoon of sea salt into 1 cup of warm water.
- To clean the piercing, you’ll soak something like a cotton ball in the saltwater solution.
- Then, you’ll apply it to the front and the back of the piercing to saturate the area. If needed, you can use a dampened cotton swab to gently brush away any crust.
- Pat the area dry using a paper towel or low-ply cloth that won’t snag.
To help your piercing heal more quickly, soak the area at least twice daily with your solution. Depending on the location of your piercing, this may be difficult, but you can use a large bowl or soak a cotton swab in the saline solution and place it on the piercing site. If you have any questions about this process, your piercer can help.
Industrial Piercing Aftercare
- Use a homemade saline solution or an antibacterial cleanser approved by your piercer each day.
- Use safe metals like K gold and implant-grade titanium that you aren’t allergic to.
- Avoid touching and playing with your helix jewelry.
- Allow it to fully heal before changing the jewelry.
- Avoid sleeping on the ear you had pierced.
- Avoid contact with scented soaps, perfumes, chemicals, and other chemicals.
- Wash your hands with antibacterial soap when you do clean or touch the piercing and jewelry.
You should ensure you get pierced by someone experienced and reliable who utilizes the right cleaning and sterilization procedures. You’ll also need to choose high-quality jewelry that you aren’t allergic to. After you get your piercing, be sure to follow all instructions from your piercer.

